
How to Mount Starlink Dish: Step-by-Step Guide
Table of Contents
- What You Need Before You Mount Starlink Dish
- Run a Starlink Obstruction Check First
- Step 1: Choose Your Mounting Location
- Step 2: Roof Mounting Techniques
- Step 3: Ground Pole and Wall Mount Installation
- Step 4: Starlink Cable Routing Tips and Weatherproofing
- Starlink Mounting Accessories Worth Buying
- Grounding, Lightning Protection, and Maintenance
- Frequently Asked Questions
Last Updated: September 4, 2026
Mounting a Starlink dish correctly is the difference between a rock-solid connection and a frustrating cycle of dropouts and slow speeds. The dish needs a clear field of view to the sky, and the mounting method determines whether it stays aligned through storms, heavy snow, and seasonal shifts. In this guide from BACKUPMYFILESNOW, we break down the exact steps to mount Starlink dish systems safely, covering roof, ground, and pole options.
What You Need Before You Mount Starlink Dish
Gather the right tools and hardware: a drill with bits for your surface, a socket or wrench set, a level, a tape measure, and a pencil for marking.
While Starlink includes a basic kickstand, most permanent installations need a dedicated mount. Third-party accessories often offer better flexibility for tricky locations. Also have waterproofing sealant, cable clips, and a grounding wire on hand.
Run a Starlink Obstruction Check First
The most common reason a Starlink installation underperforms is obstruction, not a faulty dish. The app's built-in obstruction check uses your phone's camera to scan the sky from your proposed location, showing where trees, buildings, and other obstacles will block the signal.
Run this check from the actual spot where you plan to install the dish, not from the ground. Hold your phone where the dish will sit and rotate slowly. The app will flag obstructions and estimate downtime. Even a small branch can create periodic dropouts during wind or leaf season.
Aim for a completely unobstructed view, roughly 100 degrees centered on the satellite constellation. If your first choice fails the check, move to another spot and scan again before committing.
Step 1: Choose Your Mounting Location
The ideal location balances a clear view of the sky with structural integrity. Roof peaks are the most common choice because they clear nearby trees and buildings. Ground mounts work well with open yard space, and wall mounts suit properties where roof access is difficult.
Consider how the dish will perform across all four seasons. A spot clear in summer may sit behind a leafed tree in spring or under a snow drift in January. Think about maintenance access too, can you reach it safely to adjust or clean it?
Signal strength depends on more than a clear sky. The dish uses a motorized mount to align itself, so leave at least a few inches of clearance on all sides to adjust elevation and azimuth without hitting a wall or roofline.
Step 2: Roof Mounting Techniques
Roof mounting is the most common way to install a Starlink dish because it typically offers the clearest view of the sky. However, it is also the most technically demanding and carries the highest risk of water damage if done incorrectly. This section covers the two primary methods, ridge mounts and chimney mounts, along with critical flashing and waterproofing techniques.
Ridge Mount Installation
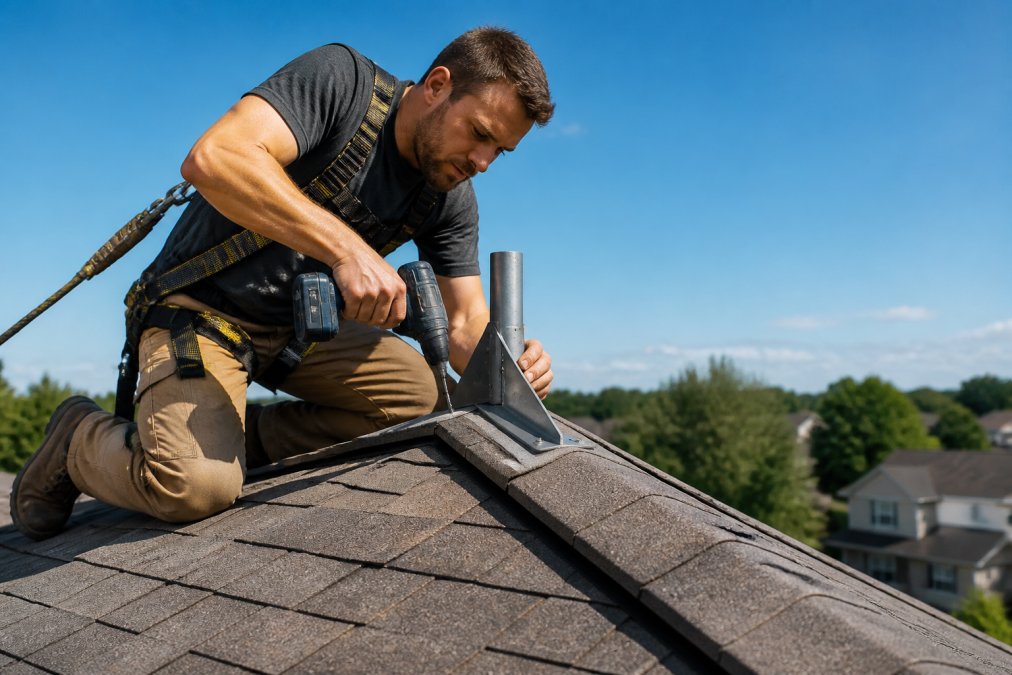
A ridge mount attaches to the peak of your roof, the highest point and often the best unobstructed view. The key is ensuring the mount is anchored to the roof structure, not just the shingles.
Tools and Materials:
- Cordless drill with a hex driver and drill bits
- Socket wrench set with extensions
- Stainless steel lag bolts (typically 3/8 inch diameter, 4-5 inches long)
- Roofing sealant (polyurethane-based, such as Sika or Geocel)
- Flashing kit (if not included with the mount)
- Safety harness and anchor
- Level
- Tape measure
- Pencil
Step-by-Step Process:
- Position the Mount: Center the base over the peak, verify it is plumb with a level, and mark bolt holes.
- Pre-drill the Holes: Drill pilot holes through the shingles into the roof deck, slightly smaller than the bolt diameter (e.g., 5/16-inch bit for a 3/8-inch lag bolt).
- Apply Sealant: Apply a generous bead of roofing sealant around each hole and under the entire base for a watertight barrier.
- Set the Mount: Insert lag bolts and tighten with a socket wrench until snug, then give an extra quarter turn, do not overtighten, as this can crush shingles and cause leaks.
- Install Flashing: If not integrated, slide a metal flashing piece under the shingles above the mount and over the base, sealing the top edge.
- Attach the Dish: Secure the dish per manufacturer instructions, ensuring at least 4 inches of clearance for motorized alignment.
Chimney Mount Installation
Chimney mounts are an alternative when the roof peak is not accessible or the chimney offers a better view. They attach to the masonry using brackets and stainless steel bolts.
Key Considerations:
- Masonry Type: Brick, stone, or concrete block each require different anchors. Use masonry anchors rated for the weight, typically 1/2-inch expansion anchors.
- Structural Integrity: Inspect for cracks or loose mortar before installing; a damaged chimney may not support the load.
- Clearance: Ensure the dish is not blocked by the chimney itself; you may need an offset bracket.
Installation Steps:
- Mark the Bracket Positions: Hold brackets against the chimney, mark bolt holes, and ensure they are level.
- Drill the Holes: Use a hammer drill with a masonry bit, drilling into brick rather than weaker mortar.
- Insert Anchors: Tap expansion anchors into the holes and tighten to expand against the masonry.
- Attach the Brackets: Secure brackets with provided bolts, torqued to the manufacturer's specification.
- Mount the Dish: Attach the dish and adjust the angle as needed.
Flashing and Waterproofing Details
The most common cause of roof leaks after installation is improper flashing, a metal or rubber piece that directs water away from the penetration point. For ridge mounts, flashing should be integrated or added separately. Apply a thick layer of sealant around the base and over bolt heads, using a product compatible with your roofing material, polyurethane for asphalt shingles, silicone for metal roofs.
Safety Precautions for Roof Work
Working on a roof is inherently dangerous. To minimize risk: use a safety harness anchored to a secure point; avoid wet, icy, or windy conditions (above 15 mph); use a ladder rated for your weight, extended at least 3 feet above the roofline; and have a spotter on the ground. If you are not comfortable at heights, hire a professional installer.
Step 3: Ground Pole and Wall Mount Installation
For properties with open yard space, a ground pole mount is often the simplest and safest option. These use a telescoping pole set in concrete or attached to a sturdy base, elevating the dish to see over low obstacles.
To install, dig a hole roughly three feet deep, set the pole, and fill with quick-setting concrete. Allow at least 24 hours to cure before attaching the dish. For a non-permanent option, some pole mounts use a weighted base without concrete.
Wall mounts are a good middle ground for homes with limited yard space but difficult roof access. They bolt directly to an exterior wall, typically near the eaves. Locate wall studs and use heavy-duty anchors rated for the combined weight. A wall mount works best when the wall faces open sky, not a neighbor's house or treeline.
Step 4: Starlink Cable Routing Tips and Weatherproofing
The cable from the dish to your router is the most fragile part of the system. Route it along the underside of the roofline or through a conduit to protect it from UV rays and physical wear.
Never leave the cable on the ground where it can be cut or chewed. Use cable clips to secure it to walls, and drill a drip loop, a slight U-shape that lets water run off, just before the cable enters your home.
Seal the entry hole with exterior-grade silicone or a rubber grommet. If running through a wall, use a conduit kit for a clean, weatherproof pass-through.
Starlink Mounting Accessories Worth Buying
While the standard kickstand works for temporary setups, a permanent installation benefits from dedicated accessories. The right choice depends on where you are mounting and whether you need travel flexibility or a fixed solution.
- Flat mounts are ideal for RVs, boats, and vehicles. They attach directly to any flat surface and allow for quick removal when you park or dock.
- Pole mounts work well for ground installations and offer adjustable height to clear obstructions.
- Explorer mounts are designed for portable setups where you need to break down and set up the dish frequently.
At BACKUPMYFILESNOW, we stock a curated selection of Starlink mounting accessories from trusted manufacturers. Options like the Starlink Mini Quick Release Flat Mount let you move your dish between locations in seconds, while the Star-Mount Voyager Mount for Gen 3 Starlink provides heavy-duty protection for permanent installations. For a simple ground setup, the Yescom Starlink Pole Mount Kit includes a telescoping pole and adapter.


| Mount Type | Best For | Key Consideration |
|---|---|---|
| Flat Mount | RVs, boats, vehicles | Quick release, low profile |
| Pole Mount | Ground installations | Adjustable height, needs concrete base |
| Explorer Mount | Portable/travel use | Lightweight, break down and set up |
| Ridge Mount | Permanent roof installs | Most stable, requires roof work |
Grounding, Lightning Protection, and Maintenance
A properly grounded Starlink installation is a safety requirement. The dish and mount can carry dangerous voltages if lightning strikes nearby, and without a proper ground path, that energy can travel through the cable into your home, damaging the router and other devices. This section covers grounding essentials, code references, and a maintenance schedule.
Why Grounding Matters
The National Electrical Code (NEC) requires any outdoor antenna or satellite dish be grounded to a listed grounding electrode. Starlink's instructions include a grounding lug on the mount, but many users overlook it. Grounding dissipates static charge and provides a low-impedance path for lightning-induced surges, your first line of defense even against nearby strikes.
Grounding Methods and Code Compliance
Most residential installations connect the grounding wire to one of the following:
- Grounding rod: A copper-clad steel rod driven at least 8 feet into the earth, placed as close to the dish as possible, attached with an approved ground clamp.
- Main electrical panel ground: If the dish is within 20 feet of the panel, run the conductor to the panel's ground bus, often the simplest, most code-compliant route.
- Intersystem bonding termination: Many newer homes have a terminal block near the electric meter for bonding communication equipment, required by NEC 810.21.
The grounding conductor should be a single, continuous length of copper wire, typically 10 AWG or larger, routed as straight as possible. Avoid sharp bends and splices. If running through a wall, use a bushing or conduit to protect it.
Surge Protection at the Router
Grounding the dish is only half the equation. The cable entering your home should also pass through a surge protector designed for coaxial or Ethernet lines. Starlink's router has built-in protection, but an inline protector at the point of entry adds a layer. Look for one rated for outdoor use with a low clamping voltage (below 100V).
Maintenance Schedule for Longevity
A correctly installed mount can last for years with routine maintenance. Professional installers recommend:
- Every 6 months: Inspect bolts and nuts for tightness, verifying torque (typically 20-30 ft-lbs for roof mounts). Re-tighten any loosened by wind vibration.
- Every 6 months: Check waterproofing sealant around the mount base and cable entry for cracks or gaps; reapply a polyurethane-based exterior sealant if damaged.
- Annually: Inspect the cable for UV damage, cuts, or rodent chewing, especially where it rubs against sharp edges. Replace if the outer jacket is compromised.
- After severe weather: After a hurricane, tornado, or heavy ice storm, visually inspect for movement or damage and use the Starlink app to check alignment.
Seasonal Considerations
In snowy climates, snow and ice can add significant weight. Most dishes have a snow melt mode, but it only works when powered. If you lose power, clear snow manually with a soft-bristle brush or plastic scraper, never metal, which can scratch the radome. Also ensure the mount handles local wind load: the dish has about 2.5 square feet of surface area, translating to roughly 50 pounds of force at 100 mph winds. Anchor roof mounts to structural members, not just decking.
Non-Destructive Mounting Solutions
For renters or anyone who cannot drill into the roof or walls, several non-destructive options provide a secure installation, ideal for temporary setups or those who move frequently.
- Weighted base stands: A heavy base (often filled with sand or water) holds the dish pole upright. Stable in moderate winds but should be secured with guy wires in windy areas. A common model uses a 50-pound sandbag.
- Tripod mounts: A tripod with a central pole can be placed on a flat surface like a patio or balcony. Some have adjustable legs for uneven ground. Less stable than a weighted base but easier to transport.
- Roof edge clamps: For flat roofs or parapets, a clamp attaches without penetrating the membrane. Popular for commercial buildings but also available for residential use.
Each option has trade-offs in stability and wind resistance. For permanent installations, a drilled mount is always more secure, but non-destructive mounts are viable for temporary or rental situations. Always check with your landlord or HOA before installing.
Frequently Asked Questions
Should Starlink be flat or angled?
The dish auto-adjusts to the correct angle after you power it on, so you don't need to angle it manually. The dish's motor handles alignment. Your job is to give it a clear field of view. A flat mount works when the dish can still see the sky. Use the Starlink app's obstruction check to confirm the location gives the dish the open view it needs before you secure it.
Can I mount my Starlink dish on a chimney?
Yes, a chimney mount is a good option when roof space is limited, since it clears the roof peak for a better field of view. Use a non-penetrating chimney mount with stainless steel straps. Verify the chimney is structurally sound and seal any drilled holes with waterproofing sealant. The extra height can help reduce obstructions from trees and nearby buildings.
Do I need a professional to mount my Starlink dish?
For a simple ground or wall mount, DIY installation is straightforward if you're comfortable with basic tools like a drill and wrenches. For steep roofs, two-story walls, or complex cable routing, hiring a professional is advisable. Safety matters more than saving money. If you work at height, use a safety harness and follow local building codes. A poorly mounted dish risks damage and signal loss.
What Starlink mounting accessories do I actually need?
Most installs need a mounting bracket or pole, stainless steel hardware, a grounding wire, and waterproofing sealant. For renters, a non-penetrating roof mount or a [Starlink Mini Quick Release Flat Mount](https://backupmyfilesnow.com/products/starlink-mini-quick-release-flat-mount) avoids permanent damage. The [Star-Mount Voyager for Gen 3 dishes](https://backupmyfilesnow.com/products/star-mount-voyager-mount-for-gen-3-starlink) adds protection and flexible positioning. Match the accessory to your dish model and mounting surface.
Getting your Starlink dish mounted correctly takes planning, the right tools, and attention to detail. The payoff is a stable, high-speed internet connection that holds up through storms and seasons. BACKUPMYFILESNOW carries the mounting hardware, cable accessories, and backup connectivity gear you need to complete the job, all at wholesale prices with free shipping on qualifying orders. Shop our Starlink collection today and get your installation done right the first time.
This article was written using GrandRanker